Archive | Desserts RSS feed for this section

Homemade Sorbet – Without an Ice Cream Maker

23 May

Homemade strawberry sorbet in an egg dish

 Sorbet: Fruit, water, sugar.

I think you can manage.

Serves: 4

Ingredients

  • 1 pint of strawberries – hulled and sliced
  • 1/3 sugar – more or less depending on the sweetness of your strawberries
  • 1/3 cup water
  • 2 tbsp lemon juice – optional

Step 1: Put all of the ingredients into a medium-sized sauce pan.

Step 2: Stir over medium – low heat for 10 minutes or until strawberries become soft.

Step 3: Remove from heat. Puree in a blender, or by using a hand blender. 

Step 4: Pour into a large shallow pan or dish and put in the freezer.

Step 5: Every half an hour, check the sorbet. Take a spoon and drag it over the sorbet so it remains light and fluffy. Repeat until frozen.

Step 6: Serve! If it gets too hard, let it sit for 5 minutes before serving and then scoop it up.

* The texture of the sorbet with this method isn’t the same as using an ice cream maker, but it’s still just as delicious and refreshing. I’ll use the money I’d spend on an ice cream maker to buy more liquor. Win.

ENJOY!

I just had a really great idea. Add VODKA! Duh, why didn’t I think of this before?! Headed to the store right now. Strawberry Sorbet – Round 2: not for children.
How to freeze

Chocolate Covered Everything – Part 2

15 May

So I starting thinking, what’s better than chocolate covered fruit?

Chocolate covered chocolate

Oreos perhaps? Is your mind blown? Mine is.

Chocolate covered oreosChocolate covered oreos

Want the recipe? Check out my chocolate covered strawberries recipe here! Follow the same steps, except use Oreos. You will not be disappointed.

Chocolate Covered Everything

11 May

Chocolate covered strawberries

Show someone you care by making chocolate covered strawberries..
… and not eating them all before they come home.

I love strawberries. I love chocolate. The end.

Ingredients

  • Strawberries
  • Chocolate – chopped
  • Oil
  • Toothpicks
  • More chocolate
  • Love

Step 1: Wash the strawberries. Lay them on paper towel to dry. There can’t be ANY moisture on the strawberries or they’re going to be duds. 

Step 2: Heat a small pot filled halfway with water over medium heat (or a double broiler) and place a bowl on top. Add the chocolate and stir continuously until almost completely melted. Remove the bowl from the pot and keep stirring until smooth. At this point it’s acceptable to dip your (clean) finger in the chocolate and have a taste. Mmmmm melty chocolate. 

Chocolate covered strawberriesStep 3: If you think your chocolate is too thick, add a tiny bit of oil to it and stir. Repeat this until you have reached the desired consistency. Make sure not to get ANY water in the chocolate or you’ll be sorry. It gets all lumpy and awful looking. Even I didn’t want to eat it. 

Step 4: Jam toothpicks in the top of the strawberries and dip those bad boys into that sweet, sweet chocolate. If you want to coat your strawberries in chocolate bits or nuts, this is the time to make it happen.

Chocolate covered strawberries
Step 5:
Use a colander or a baking sifter to hold the strawberries, or alternatively place them on wax paper to harden. You’ll probably have to put them in the fridge for a bit for them to completely harden, but try not to leave them in too long. When chocolate gets cold or humid it tends to get that white tinge (as some of mine did). Let them cool just until hardened and then remove them from the fridge. Chocolate should be eaten at room temperature.

Chocolate covered strawberries
Step 6:
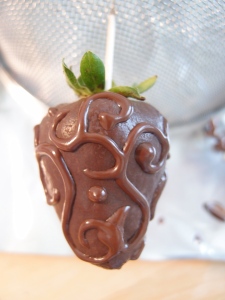
This is the best step. Decorate! Get creative, people might actually be impressed. Make sure to let the base coat of chocolate cool before decorating or it will all smear together. You can decorate with other chocolates, just follow step 2. If you want to make intricate designs, just put a bit of your melted chocolate into a pastry bag with a small tip, or put the chocolate into a plastic sandwich bag and snip one of the corners. After you’ve decorated them, place them back in the fridge for  few minutes to harden and then you’re done!

Chocolate covered strawberries

Chocolate covered strawberries

Chocolate covered strawberries

Chocolate covered strawberries

ENJOY!

How-to: Save $4 a day on Chocolate Frappuccinos

8 May

Chocolate Frappuccino

Do you know how to make coffee?

Do you know how to make or obtain ice?

Do you have a cow or perhaps just a plain old carton of milk?

Did you answer yes to all of these questions? You did? Then you’re in luck! YOU can make your very own frappuccino at home! Don’t you feel a tiny bit special? I do. I don’t care if it isn’t justified.

Lately I’ve been craving a frap, but am totally unwilling to fork over the money to get one.. especially since I can make coffee and espresso at home. Once in a while I’ll treat myself to a beautifully crafted Starbucks frappuccino, but for all of those other times when $4 seems like too much money to pay for the simple combination of ice, milk and coffee you can always turn to this recipe.

My Chocolatey-Chocolate Frappuccino Recipe:

Ingredients

  • 1 cup of small ice cubes
  • 1 cup of milk
  • 2 shots of espresso or 3/4 cup of really strong coffee
  • 1 tbsp sugar – more or less depending on how sweet you already are
  • 1 chunk of dark chocolate – minced (or chocolate chips)
  • Whipped cream – optional

Step 1: Place 1 cup of ice cubes and 1 cup of milk in a large glass. Use a hand blender or a regular blender to crush the ice until it becomes very slushy.

Chocolate Frappuccino

Step 2: In another large cup mix together the 2 shots of espresso (or coffee), 1 tbsp sugar and half of the minced dark chocolate and stir until everything dissolves.

Chocolate Frappuccino

Step 3: Pour the espresso into the glass with the milk and crushed ice. Stir in the remaining chocolate pieces, reserving a few shavings for the top.

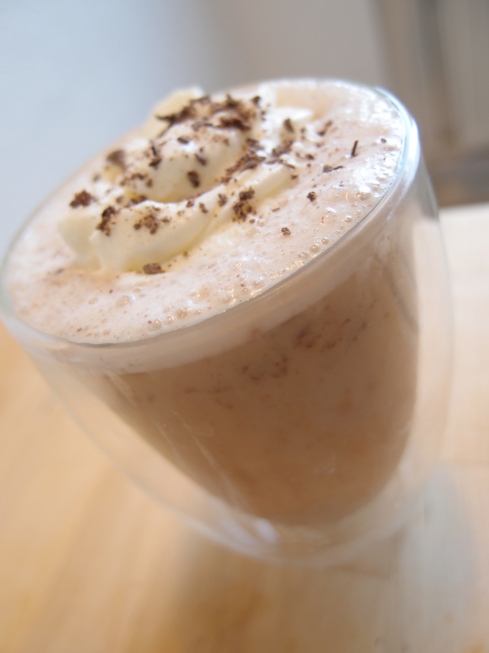
Step 4: Top with whipped cream and dark chocolate shavings.

Chocolate Frappuccino

ENJOY!

TIPS:

Throw whatever you want in it. It’ll probably taste good. Try Nutella. That would be badass.

Cinna-buns

5 May

Now you can enjoy your guilty food pleasures at home – no more standing in the cinnabon line feeling ashamed. Feel ashamed from the comfort of your own home!

makes 12

Ingredients

  • 1 cup warm milk
  • 2 1/2 tsp yeast
  • 2 eggs
  • 1/3 cup butter, melted
  • 1 tsp salt
  • 1/2 cup sugar
  • 4 1/2 cups all purpose flour
  • 1 cup brown sugar, packed
  • 2  1/2 tbsp ground cinnamon
  • 1/3 cup butter, softened
  • 1  pkg cream cheese, softened
  • 1/4 cup butter, softened
  • 1/2 tsp vanilla extract
  • 1 1/2 cups icing sugar


Step 1:
In a large bowl dissolve 2 1/2 tsp of yeast into 1 cup of warm (not hot) milk. Let sit for 5 minutes.

Step 2: Add 2 eggs, 1/3 cup of melted butter, 1 tsp salt, 1/2 cup sugar and stir until mixed. Slowly add in the flour and knead until completely mixed.

Step 3: Lay the dough on a floured surface and roll into a 15×20 inch rectangle. Spread the 1/3 cup of butter over the entire surface of the dough. Mix together the cinnamon and sugar and sprinkle evenly over the butter. Roll the dough lengthwise and using thread or a very sharp knife, cut into 12 pieces.

Step 4: Arrange in a greased baking pan. Let rise for 20-30 minutes until doubled in size. Pre-heat oven to 375˚F (190˚C). Bake for 20-30 minutes until golden brown.

Step 5: While the cinnamon buns are baking, make the frosting by creaming together 1 pkg of cream cheese, 1/4 cup butter and 1/2 tsp vanilla extract . Slowly add the 1 1/2 cups of icing sugar and mix until smooth.

ENJOY!

Chocolate chocolates with chocolate (and caramel!)

18 Apr

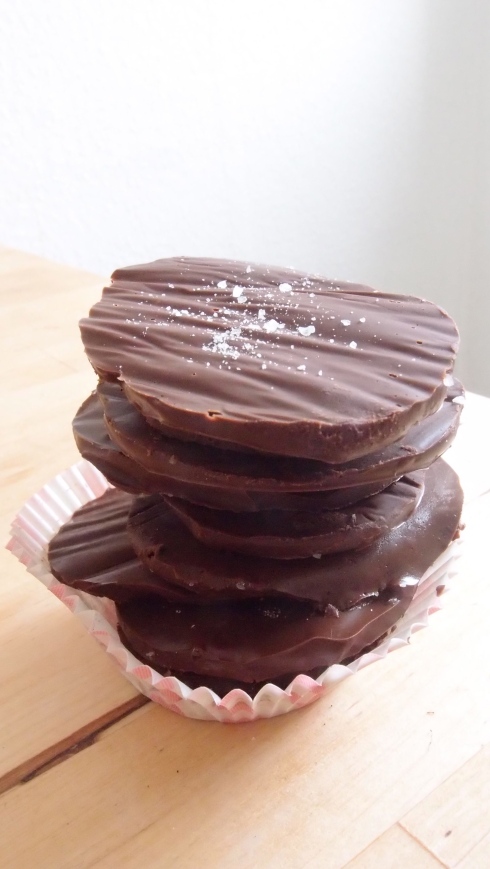
Chocolate caramel sea salt coins.

“Any sane person loves chocolate.” – Bob Greene

Beyond my addiction to wine, I have another amazing addiction. Chocolate. But who doesn’t like chocolate you ask? People without souls. Have I offended non chocolate lovers? Well I’m sorry, I was joking…mostly.

These little chocolates are gooey, salty and totally worth the 30 minutes that it takes to make them. What a great gift this would make too, people love home made stuff – and if they don’t love them they must be seriously disturbed (see above quote).


Ingredients

  • 200g dark chocolate cut up into small chunks
  • 1 1/2 tbsp. sugar
  • 1/4 cup cold heavy cream
  • sea salt

Step 1: Heat a small amount of water in a  double broiler over low-medium heat (or a makeshift pot and bowl) and add the chocolate chunks.

Step 2: While the chocolate is melting, heat a small frying pan over low heat and sprinkle the sugar in evenly. Cook until sugar has melted and turned a dark amber colour – check out this picture for reference.

Step 3: Add 1/4 cup of cold cream and stir vigorously for 30 seconds, turn off the heat and continue to stir until completely combined. The cream is going to bubble up when you first put it in, but just stir like crazy and then you’ll have made caramel!

Step 4: Once the chocolate has completely melted add the caramel and stir until combined. Let the mixture sit for 5 minutes to cool, then stir again.

Step 5: Line a baking tray with plastic wrap or wax paper and drop spoonfuls of chocolate on the tray leaving an 1 1/2 inches between each chocolate.

Step 6: Sprinkle each chocolate with a bit of sea salt. To get flat round chocolates like mine, cover the top of the tray with more plastic wrap and with another large flat object, lightly press on top of the chocolates until slightly flattened. Be careful not to squish them too much. Refrigerate until they’re solid and then eat all of them by yourself. 

ENJOY!

TIPS:

Ruffle the top layer of plastic wrap to create a wavy pattern on the chocolates

Coat in cocoa powder for a more lavish look

Wine jelly – Another way to consume wine

17 Apr

WINE JELLY IS GOOD

Wine Jelly

I can eat wine now?

So wine jelly is awesome. Made more awesome by hot sauce.

Have you ever been really brave while buying wine and decided to try something new only to discover that your moment of spontaneity has resulted in a horrible bottle of foot wine? (foot wine is what I like to call bad tasting wine – simply because it usually smells like feet) What will you do with an entire bottle of wine?! Don’t fret little jelly beans, I can make it all better.

This little gem can be made with any red or white wine no matter how terrible it is. AND it makes a nice gift as well. If someone gave me wine jelly? Hello new best friend.

So let’s get to it!


Ingredients

  • 1 cup wine
  • 1  cup sugar – you can add more or less sugar to taste
  • 2 gelatin leaves – soak in water for 2 minutes before use


Step 1: In a small sauce pan bring the cup of wine to a boil.

Step 2: Add the sugar and stir continuously until dissolved. Let the mixture boil for another 2 minutes.

Step 3: Add the gelatine leaves that have been soaking in water to the hot wine mixture and stir in until dissolved completely.

Step 4: Pour into ramekins and refrigerate overnight until set.

ENJOY!

TIPS:

Top it with Sriracha hot sauce and serve with crackers and brie

Dip the ramekins into hot water for 3 seconds, then tip upside down to remove the jelly

Eat while playing Zombies – Right Cate?

Pav-lovin’

16 Apr

Oh Pavlova. I enjoyed making you and eating you.

My wee little pavlova

 I heart Pavlova, what a great spring time recipe. Just in time for strawberry season! I made some mini ones and big ones. Both equally delicious.

Ingredients

For the shell:

  • 5 egg whites
  • 1 1/4 cups castor sugar
  • 1 tsp. white vinegar
  • 2 tsp. corn starch
  • 1 Vanilla bean or 1 tsp. vanilla extract
  • pinch of salt
And then the filling..
  • 1 cup whipping cream
  • 1/4 cup castor sugar
  • Fresh fruit – Typically kiwi, strawberries and currents are used.

Step 1: Beat the egg whites in a clean dry (non plastic) bowl with an electric mixer on medium speed until it starts to form soft peaks. Slowly add the sugar 1 tbsp at a time while continuing to blend. Once all the sugar has been blended, the mixture should be able to form stiff peaks

Step 2: With a plastic spatula fold in the white vinegar, corn starch, vanilla extract and a pinch of salt.

Step 3: Heat your oven to 110 °C (230°F. Line a baking tray with parchment paper. Scoop the mixture on to your baking tray and form a round mound with the edges slightly higher than the middle.

Step 4: Bake in the oven for 60-75 minutes until the edges are crisp and slightly browned.  Turn off the oven and leave the shell inside. Prop open the oven door and let sit for 30 minutes more.

Step 5: Mix the whipping cream and the sugar with an electric mixer until fluffy. Scoop the whipped cream onto the shell.

Step 6: Arrange the fresh fruit on top and serve immediately.

ENJOY!

TIPS:

Don’t overmix the egg whites or they will become soupy

The meringues can be made up to two days ahead and stored in air tight containers


Pavlova

Crepes! Your new addiction.

26 Jan

Crepes

Get the stretchy pants out!

Crepes! A.K.A France’s masterpiece (ya know, besides The Eiffel Tower, The Louvre, Champagne and most importantly, wine).

It also holds the title of being one of my favourite desserts. If you haven’t made them before, this is your day.

(I’m sorry in advance for your inevitable addiction to them)

Serves 2

Ingredients
  • 1/2 cup Milk
  • 1/2 cup Water
  • 1 cup All purpose flour
  • 2 Eggs
  • 1/4 tsp. Salt
  • 1 1/2 tbsp melted Butter
  • 1 tbsp Sugar (optional if you’re making savoury crepes)
  • 1 tsp Vanilla extract (optional if you’re making savoury crepes)
  • Butter for pan

Step 1: Add all of the ingredients to a large bowl (minus the butter needed for the pan) and mix with a hand blender until the mixture is smooth and has no lumps. (lumpy crepes = bad) The mixture should be very thin and runny. 

Step 2: Heat your pan over medium-high heat and add enough butter to just cover the bottom.

Step 3: Once the pan is hot enough, add 1/4 cup of batter and tilt the pan until the batter has completely covered the bottom. (using a 9 in. pan works best)

Step 4: Cook for about 1 1/2 minutes and flip. Cook for an additional 30 seconds. RULE: the first crepe will always turn out horribly. You should hide the evidence by putting it directly into your mouth.

Step 5: Serve warm with one of these toppings:

  • Sprinkle with sugar
  • Mix frozen blueberries, a tbsp of hot water and 1/2 tsp of cornstarch in a sauce pan over medium heat for blueberry sauce
  • NUTELLA
  • Cooked apples
  • Whipped cream
  • Bananas
  • Ham and Cheese
  • Asparagus and hollandaise sauce
  • Love

ENJOY!

TIPS: 

If you have leftover crepes, you can freeze them. Perfect for late night snacks..

…( I would know)

The batter should have the consistency of a heavy cream

Apple Crostata – Don’t worry, Italians have dessert covered too.

15 Jan


Apple crostataI was looking over the blog today when I came to a really disturbing realization…

…I haven’t posted any dessert recipes!

I’m not sure what’s wrong with me, but in my world, it’s absolute blasphemy. So I whipped together my favourite apple dessert and devoured it, but not before taking some pictures to show you guys what dessert NEEDS to be in your life. It’s easy, it’s delicious and you probably have all the ingredients you need to make it in your cupboards right now.

Ingredients

Crust

  • 1  1/4 cup all purpose flour
  • 3 tbsp sugar
  • 1/4 tsp salt
  • 1/2 cup cold butter
  • 3 tbsp cold water
  • 1/2 tsp vanilla

Filling

  • 3 McIntosh apples – peeled, cored and thinly sliced
  • 3 tbsp all purpose flour
  • 2 tbsp brown sugar
  • 2 tbsp white sugar
  • 1/2 tsp cinnamon

Topping

  • 1 tbsp sugar
  • 1/2 tsp cinnamon
  • 1/2 cup caramel topping – for home made caramel sauce, click here

Step 1: In a large bowl, mix 1 1/4 cup flour, 3 tbsp sugar and 1/4 tsp salt. Cut in 1/2 cup of cold butter until the mixture is crumbly

Step 2: In a separate small bowl, mix 3 tbsp cold water and 1/2 tsp vanilla. Add to the flour mixture and combine until it is the consistency of dough. 

Step 3: Roll the dough into a ball and flatten into a disk shape – about 1 inch thick. Cover in plastic wrap and store in the fridge until the filling has been completed. 

Step 4: Combine all the filling ingredients in a medium bowl and toss the apples until completely coated.

Step 5: Roll out the dough on a lightly floured surface, until it’s 12 inches wide (30 cm). Transfer to a large ungreased baking sheet and pile the apples in the middle so there is a couple of inches of exposed dough around the edge. Fold over the edges of dough and crimp slightly. 

Step 6: Combine the topping ingredients (minus the caramel) in a small bowl and sprinkle over the top. Bake in a 400 degree oven for 20 minutes, or until it’s brown around the edges. Serve warm and drizzle with caramel sauce. BAM!

Apple crostataApple crostataENJOY!